In the yard

I’ve been walking the woods hoping to find some kind of blossom…something pretty and colorful and fun to photograph. This morning I got to thinking about the rhubarb that comes up in the corner of the yard. I usually don’t notice it until it is nearly a foot tall with gargantuan leaves…

Baby rhubarb!

Bob decided he should see what I was up to…

Yea, yea, yea…rhubarb??? That’s what we’re looking at? I reminded him that he liked the rhubarb torte last year…

A little later, these two made an appearance right outside my office window.

Today….in the yard.

Homemade Tortillas

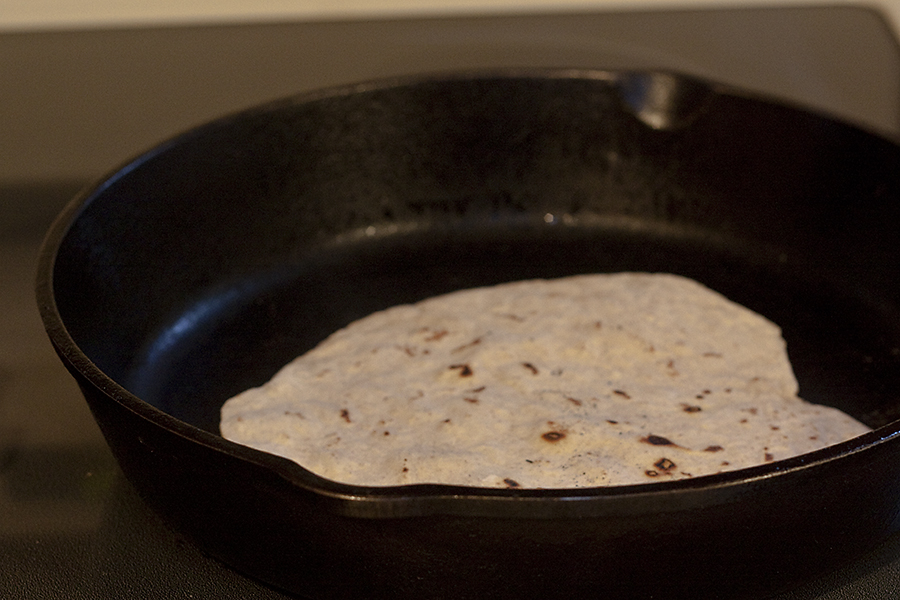
I was asked if I ever made my own flour tortillas. I make my own tortillas – both flour and corn! These photos are actually from the 4th of July. I was experimenting with getting some “action” shots with the camera on a tripod and the timer…and was going to do a post on the whole tortilla making but then forgot or ???

Both corn and flour tortillas are very easy to make. The cooking method is the same for both. The recipe for corn tortillas is a standard ratio of Masa harina and water: slightly more than 1/2 the amount of Masa in water, form a ball, flatten in a press and cook in a hot, dry, cast iron comal or skillet.

Late last Spring I started experimenting with making flour tortillas. The recipes for flour tortillas vary widely. I tried several before settling on the following adaptation of Homesick Texan’s Flour Tortillas. This recipe has no lard, just a bit of oil and makes a wonderfully flavored soft flour tortilla.

Flour Tortillas
1 cup of all-purpose flour
1 cup of King Arthur white whole wheat flour (you can use all all-purpose flour as well)
1 1/2 teaspoons of baking powder
1 teaspoon of salt
2 teaspoons of olive or canola oil
3/4 cups of warm milk

Mix together the flour, baking powder, salt and oil. Slowly add the warm milk. Stir until dough sticks together enough to knead.

Knead for two minutes on a floured surface. Dough should be firm and soft.

Place dough in a bowl and cover with a damp cloth or plastic wrap for 20 minutes.

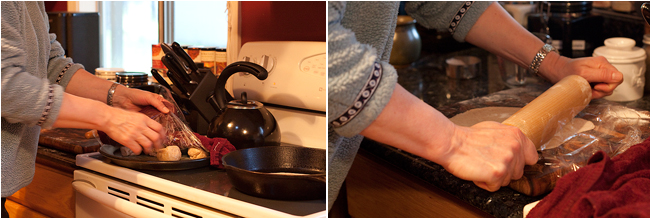
After the dough has rested, break into 8 pieces, roll them into balls in your hands, place on a plate (NOT touching!) and then cover with a damp cloth or plastic wrap for 10 minutes.

After the dough has rested, one at a time place a dough ball on a floured surface, pat it out into a circle, and then roll with a rolling pin from the center until it’s thin and about eight inches in diameter. I just roll the dough as thin as I can and I don’t worry about it being a circle. Like pie crust, do not overwork the dough.

You can roll all of the pieces and then cook them, but I prefer to cook them as soon as I roll them. I roll the next while the prior one is cooking. The cooking process is very fast. On the hot skillet, it takes only 30 seconds per side so you have to work quickly with the rolling. Whichever way you choose, keep either the balls or the rolled out tortillas covered while you work so that they don’t dry out.

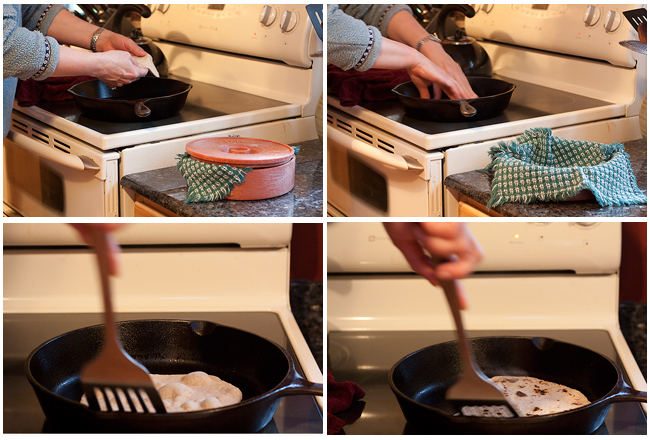
I spread them slightly in the skillet and then quickly roll my next tortilla watching the one cooking very carefully. As soon as it puffs up, flip it and cook the other side. It may puff as well. You can leave the air pockets or press them out.

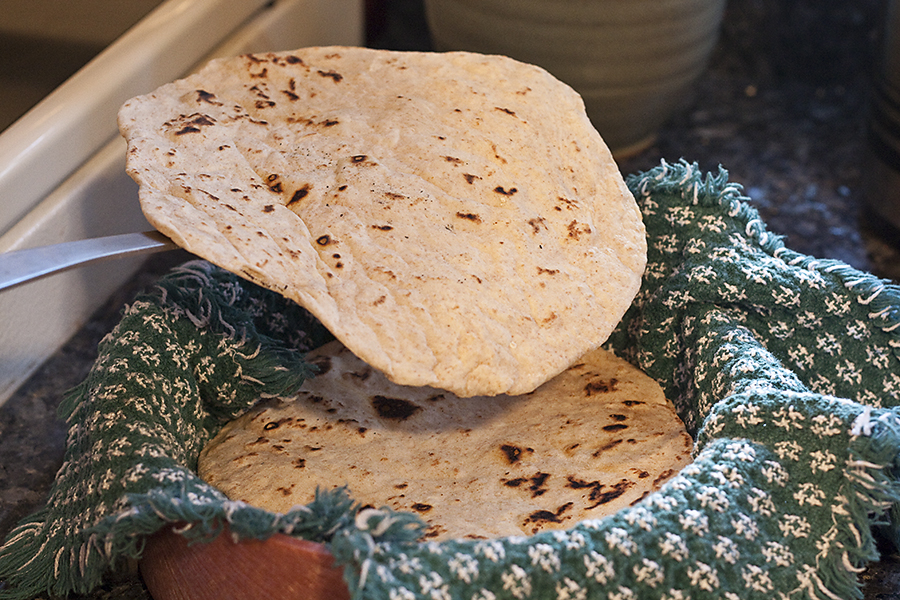
Keep them warm and covered as you work. If you don’t use all of them immediately, they keep in the refrigerator for several days. I wrap them in a towell and then in a ziploc bag for the frig.

I warn you, though…once you make your own, you will not be happy with store bought!

**EDIT 3/6 For myself, I often make 1/2 the recipe and divide the dough into 6 pieces, making smaller tortillas.

My (almost) daily bread

Once upon a time, long, long ago, when I was very, very young I was reading a young woman’s magazine and a tutorial – with photos – of how to make your own bread caught my eye. I can vividly remember working through that first tutorial and the ecstasy of a that first beautiful fresh loaf of bread made with my own hands. And I loved the entire process of mixing and kneading and rising and how good that little apartment smelled.

I’ve continued to make bread – sometimes often, sometimes not. And I started making my own pizza dough a bit later, when I was young…ish.

Fast forward and getting to late October or early November of this year when Linda Carson of The 7MSN Ranch tweeted about baking some bread and provided the link: Bermatopia’s Artisan Bread Awesomeness.

Coincidentally, I had just failed at my first attempt to make an artisanal Ciabatta recipe. Being not so young any more and needing reading glasses and assuming I knew what I was doing with 35 plus years of baking experience behind me, I used the wrong flour.

Anyway, this recipe looked so much easier and Linda made it and raved about its ease so I plunged in….and it changed my life!!! I am not kidding.

Not only was the bread good with that custardy crumb and crisp crust of a bakery ciabatta or boule, as I did some research on the high moisture doughs and bought Artisan Bread in 5 minutes a day I discovered the thing that provided further enlightenment and the real life changing part. The dough can be refrigerated and you can pull out what you want on any given day and bake a fresh loaf of bread: elapsed time from frig to table is about an hour, hands on baker’s time is about 5 minutes. The time to mix the dough and get it in the frig in the first place is about 10 minutes.

It is not only the short time involved. Bakery artisanal breads are expensive and taste best the day made and as I prefer to not weigh 900 pounds AND I moderate gluten intake, paying $4 or $5 for a loaf of the bakery bread that mostly gets converted to croutons or bread crumbs gets spendy. The dough can be refrigerated for 7 days and the longer it is in the frig the more “sour” (as in sourdough) it tastes – without dealing with a starter!

I’ve stuck with the quantity in the Bermatopia’s Artisan Bread Awesomeness recipe (vs the larger amount in the book) and that works fine for me to make a little loaf to have with soup or stew, hot pockets or pizza crust and use up the dough within 7 days.

Linda at The 7MSNRanch did 2 step by step posts of the night before mixing and the baking day process:
7MSN Baking Bread Part 1
7MSN Baking Bread Part 2

I don’t do the add flour until the spoon stands up thing that she does. I stick to 3 cups of flour, 1 3/4 cups of water, 1 1/2 tsp sea or kosher salt, and a packet of yeast (I used bulk yeast equivalent to a packet). Lately I’ve been making a combo of 1 cup of cornmeal, 1 cup of Semolina flour and 1 cup of Bread flour – my customization of “Artisan Bread in 5 Days'” Portuguese Broa recipe. I use store bought bread flour but any specialty flours I buy online from King Arthur flour. My favorite for rye bread is King Arthur’s “Perfect for Rye” blend and I combine 1 1/2 cups of that with 1 1/2 cups of bread flour for my rye. Artisan Bread in 5 minutes a day – either the site in the link or the book contain varieties, techniques and troubleshooting for high moisture doughs.

Bake this bread, change your life! Seriously, for any who decide to try this method and particularly if you are an experienced traditional yeast dough person…put aside all you think you know about yeast dough and just go with it. If you don’t give up what you think dough should look and feel like, you will be sure that this will never work and that the very sticky dough can not possibly become bread. But it can, it can – Halleluhah, Amen, Happy Sunday :)!

Rhu-Bob

From reader Pat in East Tennessee came a recipe for Old Fashioned Rhubarb Torte.

I took a piece and a cup of coffee out to the front porch this morning. It was cool and drizzly, so I finished it inside.

I had some help.

Rhu-Bob. (say it :)! )

OLD FASHIONED RHUBARB TORTE from Pat in East TN.

1 cup all-purpose flour, divided
5 Tablespoons confectioners’ sugar
pinch of salt
1/2 cup butter
2 eggs
3/4 cup sugar (original recipe calls for 1 1/2 cups sugar. Pat suggested 1/2 that amount and I agree – PLENTY sweet with 3/4 cup)
3/4 teaspoon baking powder
3 cups sliced fresh or frozen rhubarb

In a mixing bowl, combine 3/4 cup flour, confectioners’ sugar and salt. Cut in butter as for pastry. Pat into a 6×10 pan (I use a 9×9) and bake at 375 for 10 minutes. Meanwhile, beat the eggs, sugar, remaining flour and baking powder. Fold in rhubarb and spread over baked crust. Return to oven and bake for 35 to 40 minutes. Cool. Add a dollop of whipped cream if desired.